To be able to find the participant’s eyes the eye-tracker needs to know participant features such as the interpupillary distance and the baseline pupil size. The system uses the participant feature settings as set in the Participant page of the eyevec-control application.
The default participant feature settings suit most adults. The defaults obviously won’t work if they are far off compared to the actual participant features (think children, people with very large or very small pupils, particular eye conditions, etc.).
Also the observed graylevel separation between iris and the pupil (aka iris-pupil separation) affects the detectability of the pupil. The iris-pupil separation can sometimes be too low (some bluish eyes) or can be very high (bright pupillary zone).
The following steps describes how to adjust participant feature settings and camera sensitivity to make the system properly detect the participant’s eyes.
Enable overlay of expected eye features
In the Camera page tick the Show expected checkbox (or press z). This will overlay the main image with graphics representing the irises, pupils and IPD as can be seen in this screenshot:
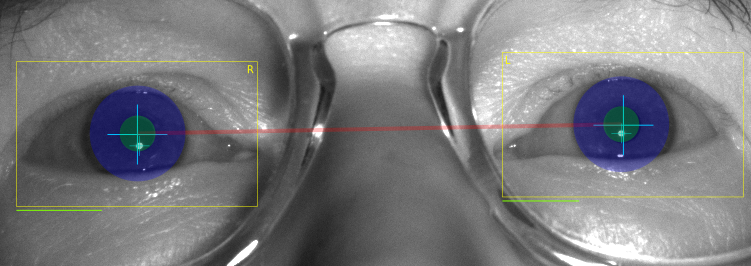
In the above example the expected IPD roughly matches the actual IPD, the expected iris (purple/blue disk) is a bit smalller than the actual iris and the expected pupil size (green disk) is a bit larger than the actual pupil. This is a good enough fit.
If the expected IPD is too small or too large the detection becomes unstable because the eyes, if detected, don’t make a valid pair according to the expected IPD.
An example, if the expected IPD is much too small you would see this:

In this case one eye is detected, the other is not. The detection will be unstable (jumpy). If the expected IPD is much too large it would fail similarly.
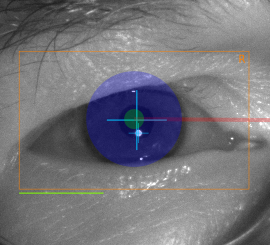
If the expected pupil size is too small or too large compared to the actual pupil size the eye detection will be unstable.
The following example shows a too small expected pupil size:
Adjust expected IPD if necessary
If the expected IPD is clearly too large or too small then adjust the expected IPD using the ← and → arrow keys until the blue disks are (roughly) centered over the participant’s irises.
With less convenience you could instead change the IPD setting in the Participant page.
Adjust expected pupil size if necessary
If the expected pupil diameter is clearly too large or too small then adjust the expected pupil diameter using the ↑ and ↓ arrow keys until the green disks (roughly) match the participant’s pupils.
With less convenience you could instead change the pupil diameter setting in the Participant page.
Adjust expected iris size if necessary (optional)
Correcting the expected iris diameter is optional, you may skip this.
If the expected iris diameter is clearly too large or too small then adjust the expected iris diameter using Shift+↑ and Shift+↓ until the blue disks (roughly) match the participant’s irises.
With less convenience you could instead change the iris diameter setting in the Participant page.
Adjust camera gamma and/or camera gain if necessary
Check the iris-pupil separation value in the statistics area of the Camera page. If the iris-pupil separation is too low it can be difficult to distinguish the iris from the pupil. If the separation value is rather high then it might happen the eye-detection algorithm runs into an internal limit.
If the value shown is low (around 20 or less) then decrease the camera gamma value using PageDown and PageUp until the value is about 30.
If on the other hand the iris-pupil separation value is very high (say above 50) then it might be necessary to increase the gamma value using PageDown and PageUp (or decrease camera gain using Shift+PageDown and Shift+PageUp) until the value is about 50 (YMMV).
Check additional participant feature settings
Check and adjust the other participant feature settings.
In order of importance:
-
Eyes detectable. If one eye is not detectable then indicate so, otherwise enable both eyes.
-
Lazy eye. If participant has a lazy are then indicate so, otherwise say no. This is an important setting.
-
Iris occlusion. If the iris and pupil are partly occluded by the eyelids indicate the level of occlusion. If the default occlusion level Mild seems to work leave it at that. If you select Severe then the gaze detection method becomes pupil-only, which implies you should use a chin rest or bite-bar.
-
Dominant eye. In case you know the participant’s dominant eye then indicate so, otherwise say no.
-
Eyelash direction. Define this to enable the system to be slightly more tolerant to artifacts likely caused by eyelashes.
-
Visual aids. Define this to enable the system to be slightly more tolerant to artifacts likely caused by dust specs on spectacles.